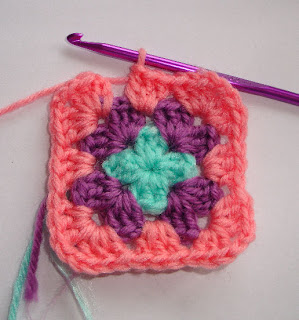
Using DK (Double Knit) yarn and a 4mm Crochet hook, make a sliding loop and pop in your hook before tightening (do not pull too tight or you will find it hard to get a stitch into it later on)
Chain 4 stitches.
then slip stitch to join them into a circle.
It might just look like a knot at this stage, but in there somewhere you should find a hole.
Chain 3 (this counts as your first Treble Crochet - hereafter known as TC)
Into the hole work a TC
Now work another 10, so you end up with 12 TC's in that little hole.
Join into a circle with a slip stitch (hereafter known as ST)
Now we are going to change colours to make it easier to follow.
So, break of your colour and pull it through the last stitch to secure, then loop the new colour inbetween two TC's.
Chain 3 (this counts as your first TC for this row)
Make another 2 x TC's into the same stitch space.
Do 2 chain
then another 3 x TC's into the same space again. It should look like this.
Counting 3 TC's from the first row, make a space and do 3 x TC's / 2 CH / 3 x TC's into that space.
Again, count three TC's from the first row, make a space and work 3 x TC's / 2 CH / 3 x TC's into that space.
And again...
Slip stitch into the top of the original 3 chain at the start of the row to join,
then slip across the next two stitches so you are at the corner ready to begin a new row/round.
This is your four corners in place.
Let's change colour again to make things easier.
So, 3 chain, then 2 x TC's, 2 chain, 3 x TC's in first space.
Jump to space in the middle as shown on photo.
Do 3 x TC's (no chain or extra TC's, just the three)
Jump to the next corner and as you are working a corner, do 3 x TC's / 2 CH / 3 x TC's into that space.
Continue in the manner until the row is complete, and slip across the top of the first cluster to arrive back in a corner space for the next row.
Basically just continue, always remembering to work the corners with two lots of 3 x TC's with 2 CH and just the 3 x TC's on the straight parts.
You can carry on making it larger and larger, or make a collection of smaller ones and fix them together :)
If you prefer to print these instructions you can find them here: www.soozintheshed.co.uk/grannysquare.pdf
Enjoy.


Hi, Well at long last, instructions I can follow. Thank you so much for making it easy
ReplyDeletefor a dummy like myself. Years ago I did a throw, but when I wanted to pick it up
again, kept losing my 4th corner. I am a happy bunny now.
Glad it was useful for you :)
Delete